New to HiveSmartHQ? We add tips here (and also on our  Facebook page) on how to make the most of the app.
These supplement the context-sensitive help that's available throughout the web app via the help icons.
Please feel free to contact us if you have any questions - we're here to assist.
Sections (Tap to visit)
1. Latest News
2. Forms
3. Currently known Issues & Workarounds
4. Hive Population
5. Usage Tips
1. Latest News
A new version has landed: https://hshq.appibee.com (Opens in a new window)
It supersedes the app-based versions on Android and iOS and, while it's now a web-based, it retains the ability to operate offline so that it can still be used in the field where no internet connection is available. Continue to use it on your smartphone or tablet (via the web address above) - and you can now use it on a desktop computer or laptop as well.
For existing users, follow the steps below to upgrade to this new version:
- Open the prior app-based version on your Android or iOS device: use the Transfer Data > Upload dataset option (via App Options & Settings)
This step is required if you've made changes to your data since you last uploaded, or you have not previously used this feature, and wish to have your data in the new version. - Open the new website via the link above, select your location and agree to the terms
- Optional: Bookmark the website address in your browser. On iOS and Android devices, you can also choose to install this as a web-application - tap the Interested in a more app-like feel info button on the home page for details.
- In the new version, use the Transfer Data > Download dataset * option (via App Options & Settings) to load your data.
* This process may revise some instances of the auto-calculated hive population figures (in cases where the underlying frame-counts are identified as being inconsistent). - After downloading your data, uninstall the app-based version as its now obsolete.
There's a demo with sample data too: Tap here to explore it (Opens in a new window)
Thanks! Your interest in HiveSmartHQ is much appreciated.
The existing app is being deprecated and will soon be replaced by a web application i.e. available via a website address (while keeping it's offline abilities).
If you wish to keep your data, it is now critical to use the Transfer Data > Upload dataset option each day if data is added/changed (via App Options & Settings).
This is required so that your data is available for download into the new version.
Stay tuned for news on the new version. Thanks for using HiveSmartHQ.
A Halloween treat for Android devices, version 2.1.2 is a technical update to conform with recent changes to Android requirements. This also addresses known issues from the prior version as well as some minor tweaks and enhancements.
V2.1.1 has left the hive - it's a technical update focused on improved performance along with some minor tweaks and enhancements.
V2.1.0 is ready to be foraged with new features including:
- the option to track the Honey Level in the Hive over time at each Service (inspection). Here's a quick overview (PDF document) for this: Tracking Honey Levels (Tap to open)
- enhanced Sales recording - each Sale can include Hives, Honey, other Products or any combination of these.
Plus other minor tweaks and improvements.
V2.0.2 has been unbottled with new features including the option to:
- flag containers (vessels) of honey as Not for Sale. This can be set as the Category when adding a vessel (via Storage Vessels) or later via Honey Inventory > Adjust Contents
- track disposals of honey. This can be recorded at the extraction stage (via Honey Extraction: select the disposal Vessel option) or at a subsequent point (via Honey Inventory > Dispose of Honey)
Various other minor tweaks and improvements are also included.
A new year and we've unwrapped Version 2.0.1 with the option to track Moisture readings for Extractions and per Honey container (Storage Vessel), as well as the ability to print Option Catalogs.
It also includes a fix to the January charting issue mentioned below.
The default "Last 13 month" chart window selection has a flaw when the current month is January.
Workaround: Use a different charting window option (e.g. "Last 6 months") until the next version is released.
Update: Issue resolved in v2.0.1
For those who don't wish to use their device out in the field when performing Services / Inspections, Collections or Extractions, you can print the Forms below and use them instead. Then update the (web) app at your leisure from the information recorded.
For those who prefer taking audio notes in the field. e.g. via Bluetooth™ to a device...
For those who prefer taking written notes... (Tap an Option to open a PDF file)
| Option A | 16x Hives on 2 pages. | Got 20/20 eyesight & small handwriting?. |
| Option B | 3 hives/page. | For the rest of us. |
| Option C | One hive/page. | Prefer just one Hive Service/Inspection per page? |
FYI: If you've tailored the Hive Condition ratings or Observations in the app, you can update these on the form to match before printing.
In Version 3.0.x (website)
None.
Issue(s) now resolved (from v2.1.2 Android & v2.1.1 iOS)
When using a time-based Varroa testing method to record a result in a Service and a Population value is not specified, the test result will not display in the Service History view.
For tests where no Population value is specified, it will also not display in the Varroa Testing view but only when there are multiple Varroa tests performed per month (for Location: All) or multiple tests on the same hive per month if a Location is selected.
Workaround: Add a population value when recording the Varroa test result in a Service (open the Hive Health Care section). Specify a Population value or tap Estimator > Use this to apply the underlying automatic population estimate.
May not complete if there is a Service with both "No Queen cells" and "Queen brood" values selected.
Workaround: Contact us to obtain an export file.
For datasets with multiple Workers registered and when editing a Service, the option to select a different Worker may not display.
Workaround: Make a temporary change to the Service date (then change it back) - the date change will trigger display of the Worker selection (assuming more than one is active on the Service date).
For a Vessel flagged as "temporary" the applicable dates may not display for an edit or view of the Vessel details.
Workaround: None - will be resolved in next version.
V1.6.0 introduced the ability to capture a Hive Population value when recording a Service. A Population Estimator tool is also provided when adding/editing a Service - see the Key Hive Features section.
It applies a calculation method that uses the quantity of boxes/frames for the Hive along with several Estimating factors.
If a Hive Population value is not specifically provided, HiveSmartHQ automatically calculates a Population estimate using the same method. Changes in the Hive Population are tracked from Service to Service.
Details about the calculation method are provided in this (PDF) document: Hive Population - Calculation method (Tap to open)
For those folk more comfortable with paper and pen, and wish to keep track of the Hive Population using this calculation method, here's a (PDF) form that may assist: Hive Population Estimator form (Tap to open - it has two pages to support double-sided/duplex printing)
For those not interested in the population of your Hives, v3.0.x introduced an option to hide this detail. Visit General Hive Choices (via App Options & Settings) and uncheck the "Show Hive Population" option.
5. USAGE TIPS
Getting Started (Tap/click an item below for more info...)
For first time use it's as easy as 1, 2, 3... . To begin, open the (web) app (https://hshq.appibee.com) then (once your location is set and Terms are agreed - first use only):
- Tap App Options & Settings on the menu to:
- Review the various Option Catalogs of drop-down selections - adjust as needed to suit your region and situation
- Then tailor the General Hive Choices and Hive Ratings that you wish to use for Services (Inspections)
- Check that the Locale Preferences are right for you.
- Use Hive Locations to add the location(s) where you've got Hives.
- Register a unique identifier (Tag/ID) for each of your existing Hives via Hive Register (or Hive Management).
There's helpful info about getting started in the HiveSmartHQ web app.
- Tap the Getting started help - left icon above the bee image - for a list of initial steps.
- Tap HiveSmartHQ in the titlebar for a list of Core actions.
- Tap the Quick reference guide help - available on the home screen initially (and subsequently via the Getting started help icon) for "how to" guidance.
If you're new to HiveSmartHQ you may wish to view some short videos that we've put together to help get you started. (Just tap the links below - video opens in a new window.)
If you're just starting with HiveSmartHQ, we recommend:
- a one-time check of the Locale Preference to ensure they match your region (via App Options & Settings).
- reviewing the General Hive Choices to flag the size of Honey Supers & Brood boxes you use (via App Options & Settings) - see next item.
- reviewing each of the Option Catalogs (via App Options & Settings).
Each Option Catalog is used to provide a list of choices that is used in the app - we've pre-loaded them with some examples but, because every region is different, you'll likely need to refine them to match with your particular needs and geographic area.
For example, the Nectar/Pollen sources might be revised to align with what's available to your bees. Similarly, you might wish to refine the catalog of Diseases to match those prevalent in your area, and the catalog of Treatments to those that you use.
Each Option Catalog allows you to:
- add new items
- "replace" existing items in the list (via an "edit")
- "hide" items (so it's not displayed as a choice)
- "sort" the items (so that those you use most often are displayed first)
If you're not sure how to do this, feel free to contact us and we'll help step you through it.
Around the world, beekeepers use different size honey boxes for a number of reasons. There's also different names for those various sizes in different parts of the world. The dimensions of each size can also vary depending on your location. Some beekeepers use just one size, others use more than one size. In some regions the Honey boxes are also known as "Supers".
HiveSmartHQ accommodates this geographic variability by providing 3 different size options for Honey boxes essentially small ("½"), medium ("¾") and large ("Full"). In the app, you can choose to use one or more of these sizes - simply select the size(s) that you use in General Hive Choices (via App Options & Settings).
The ones you select will be shown in Hive Management, Honey Extraction and relevant Views (reports). The sizes that you don't select are merely hidden (so you always have the option to start using a different size later).
The Track frames option may be useful to you if you use different numbers of frames in the same box size. If you use just one size of honey box (i.e. same dimensions) but have some with more frames inside, and some with less frames, you can just use the "size" in HiveSmartHQ as a way to differentiate these instead. e.g. an 8-frame = small, a 10-frame = medium and a 12-frame = large.
Take advantage of the flexibility in HiveSmartHQ to match your situation.
After revewing the Locale Preferences, Option Catalogs and Honey box sizes in General Hive Choices (see above), the quickest approach to getting started is to:
- Use Hive Locations to add the Locations where you have Hives, then
- Use Hive Register, select a Location and add your Hives in for that Location. It's easy to add lots of Hives quickly this way (and it's a one-time process).
Once that initial one-time setup activity is done, you're ready to add the Services (aka inspections) that you do on the Hives via Hive Management.
You might wish to simply try out the app by adding in fake information - which is OK because you can also “reset” everything when you’re ready to use real data.
To reset: Use Transfer Data (via App Options and Settings) to download a pre-existing empty database using the following details:
* Initials: zz
* Month & day: Jan 1
* Phone: 9999
This will replace any data that you have entered in HiveSmartHQ as well as any options you've changed in the app.
CAUTION: If you’ve already entered real data, or boosted your Service Credit balance with a bundle purchase, you may not want to lose the data or purchase record. However, if you wish to start again and keep any purchased Service credits, we can sort that for you - just tap the following before you reset:HiveSmartHQ@appibee.com
A Location needs to be added to reflect sites wherever you have Hives. Note that Locations can be used creatively too e.g.
- "Hive Warehouse" for newly built (unpopulated) or "unused" hives
- "Mobile 1" for a portable apiary
- "Hospital" for a quarantine location
The app provides the option to associate specific Hive parts with individual Hives (which is updated when adding a Service). However, for some situations this may not suit and you may only wish to track parts per Location (i.e. Apiary: the Hives currently at that Location).
Both options can be switched on (or off) in General Hive Choices via App Options & Settings
There are two ways to associate parts with an Apiary as illustrated below:
- via Hive Locations
- in Apiary info (via Hive Management) - select a Location to be able to add/edit Apiary info
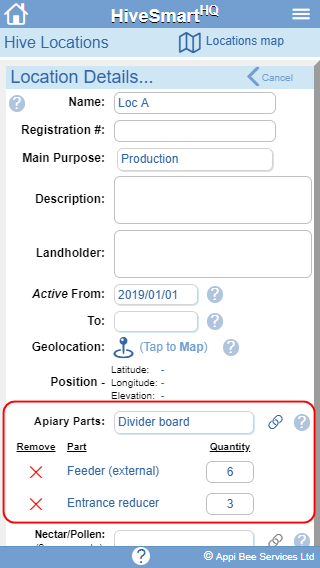
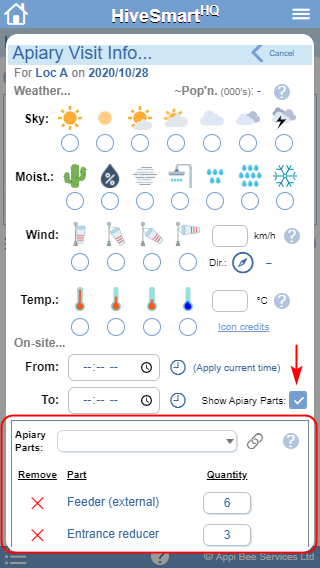
Any Parts that are assigned are automatically included in the In Use tally in the Equipment Inventory as well as available in Views: Hive Inventory by Location.
NOTE: The list of Parts available to be assigned can be modified in Option Catalogs > Parts (Hive / Apiary) via App Options & Settings
In HiveSmartHQ each Hive needs a unique ID/Tag so that all the things you enter about a Hive (e.g. Services, Extractions) can be linked to it.
The ID can be a name (yep, some beekepers we know name their hives) or simply a number.
If you’re using a number, it’s a good idea to add leading zeros so that the hives can sort properly. e.g. 001, 002, 010, 020, 100 etc (instead of 1, 2, 10, 20, 100 which would sort as 1, 10, 100, 2, 20). This is because the ID/Tag is stored as alphanumeric labels (rather than numbers) as sorting is performed alphabetically.
You can also change (“edit”) the ID/Tag for a Hive via Hive Register at any time and it will be reflected throughout HiveSmartHQ.
If you build hives (or have unused ones), you can record that these exist in HiveSmartHQ even before you start using them at a Location.
Simply register them in HiveSmartHQ and assign them to your "Workshop/Home base" Location (or add a Location such as "Unused Hives" and assign them to that).
When you're ready for the Hive to be moved to a Location and populated with a colony, simply edit the Hive (in Hive Register) and update the Location.
The last Hive added can be deleted if a Service is yet to be recorded for it. To do this, use edit for that in Hive Register and the option to delete is provided.
If this isn't applicable and an extra Hive has been inadvertently added (via Hive Register), simply "rename" the Hive (i.e. edit the ID/Tag) to something like "spare 01" and temporarily assign it to your designated "Workshop" Location.
Then, when you're ready, rename the existing "spare" (via an edit) and re-assign it to the right Location (again via Hive Register). Sweet!
Apart from the key identifying items for a Service (i.e. Hive ID/Tag, Location & Date), the only "required" information is the Hive status (auto-completed) and just the quantity of Honey & Brood/Nuc boxes/frames (in the Key Hive Features section - pre-filled if a prior Service exists). All other items are optional or auto-completed for you.
If you wish to add more inspection details, that's OK too - there's other information catered for but the app doesn't demand the provision of data you don't want or need.
HiveSmartHQ leans towards those who look after bees to make a living (or supplement their income) from the surplus honey that healthy bees produce so, in that context, the aim is to provide ease of use & fast entry balanced with capturing the info needed for operational efficiency and effective apiary management decision-making.
HiveSmartHQ is designed to be able to record Services (inspections) on a Hive with minimal effort including some quick-fill features such as a one-tap rating if the Hive is in "normal" condition.
If you wish to modify what is "normal", head on over to Hive Ratings (via App Options & Settings).
In Hive Ratings you can:
- choose whether or not to use a Rating.
- change the name of a Rating
- change the levels within a Rating
- modify what is the "normal" level for each Rating (used when tapping the Set to "Normal" option when adding a Service)
- modify what is the "optimal" level for each rating (this is used to auto-flag a Hive as having potential to be used for Queen Rearing
Why not take the pressure off trying to remember everything when you can use the Apiary Notes feature to make notes about a particular Location (apiary) and/or Service Notes for inspection notes on a specific hive. Then just refer to them via Views:Service Notes/Apiary Info before the next Service (inspection) to quickly get back up to speed.
It's a really handy time and sanity saver!
When it gets busy and you need to do inspections at multiple Locations on the same day, some beekeepers "harvest" (remove) Honey Supers from their hives and then do a consolidated collection run to pick them up from several Locations.
You can tell how many there are to pickup from each Location using the Production Summary View - just select "All Locations" and the date(s) they were "harvested" (i.e. removed) from the Hive.
When the report displays, see the number of Harvested boxes from each Location - you may need to swipe left if using a small screen. (Select a Location and you can even see which Hives they came from!)
When adding/editing a Service via Hive Management there’s no need to open/close each section of the Service input form.
Select Add Service (or Edit for an existing Service), then simply check the flag at the bottom of window to open all of the sections for faster navigation.

(This option will be retained while using any of the Hive Management options through until a selection is made from the main menu.)
Smartphones and tablets typically allow audio to be recorded. Try using a Bluetooth™ headset paired with you smartphone/tablet and record Inspection details that way.
Then update HiveSmartHQ later in a clean, more comfortable environment.
To help, we've provide a checklist "form" that you can have nearby for reference to help trigger the info you wish to record...
NOTE: You may wish to laminate the checklist if you have that option available.
Introduced in v2.1.0, the Honey level can be tracked over time for a Hive.
This is done when adding a Service so it's easy to check how much it's changed since the prior Service.
Here's a quick overview (PDF document) for this: Tracking Honey Levels (Tap to open)
HiveSmartHQ can also be used to keep a record of Honey Extractions and where the honey is stored from those extractions (inventory). It also allows sales of honey to be recorded and automatically tracks the source of the honey that is sold which means you can see which Locations (and even Hives) are most productive in terms of both honey volume and revenue earned.
Here's a "how to" overview (PDF document) for this: From Honey Extraction to Sales (Tap to open)
Adding extractions into HiveSmartHQ is pretty straight-forward - just select the Location from where the Honey boxes came and then it can be as simple as entering the amount of Honey extracted (i.e. the Yield) from a "batch" of (1 or more) honey boxes.
You can also choose to keep track of the number of honey boxes in the batch i.e. Quantity. (HiveSmartHQ keeps track of how many honey boxes were harvested for extraction so using this can be useful.)
You may even want to keep track of the extraction from each Hive so just choose the "Track by Hive" option and select the Hive, then the Quantity (of boxes) and resulting Yield.
Then you can tell not only which Locations are producing the most but even which of your Hives! Bee-autiful.
Prior to extraction, the amount of honey per Hive can be tracked across Services/inspections. Here's a quick overview (PDF document) of this optional feature: Tracking Honey Levels (Tap to open)
Extractions can also be recorded. These are often made into one vessel from which honey is then transferred into others that are sold.
For example, it might be that extractions are made into a holding tank (or bucket), from which honey is transferred to another vessel (e.g. a drum). That vessel could be sold - or it could be used to fill jars or tubs that are for sale.
HiveSmartHQ allows any combination of honey transfers and automatically keeps track of the portions of honey in each vessel relating to the extraction(s) that make up the content. Very sweet.
Here's a "how to" overview (PDF document) for this and how it fits in the process from Extraction through to Sales: From Honey Extraction to Sales (Tap to open)
There's an easy way to manage large numbers of honey containers - using the "batch" vessel feature. This is well-suited to those retailing jars of honey, along with offering extra flexibility for those selling honey wholesale.
The batch option can be selected when "adding" (i.e. registering) a vessel in Manage Vessels via Honey Inventory. For example, if you need a series of jars for honey you can add them individually OR as a single “Batch” vessel with the required quantity specified.
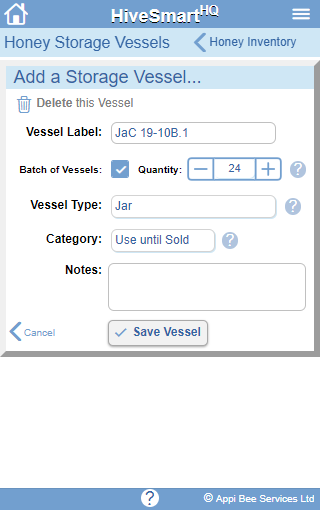
If you need to track a specific vessel, add it as an individual vessel (unselect the Batch option). When you’re unsure exactly how many vessels you need, start with a batch vessel and then add individual vessels to supplement as needed. e.g. If you’re wishing to sell by 1kg jars, and there’s at least 12kg of honey in a holding vessel but it could be more, then create a batch of 12 and add individual jars as needed.
Here's a "how to" overview (PDF document) for this and how it fits in the process from Extraction through to Sales: From Honey Extraction to Sales (Tap to open)
The Vessel name/label must be unique, so consider what to use carefully. e.g. A tracking number/code or perhaps something with meaning such as JaC 19-10B.1.
This example has:
- an indicator of the vessel type “J” = jar
- “a” as a size indicator. (This helps ensuring similar vessels are grouped together when listed in alphabetical order)
- the type of honey e.g. “C” for Clover
- the season or date extracted e.g. “19-10” for Oct 2019
- “B” = batch vessel indicator
- allowance for multiple instances e.g. “.1”
Note that the app tracks the amount of honey associated with a vessel (via Extractions and/or Honey Transfers) NOT the capacity of each container. i.e. labelling may be used to help indicate a vessel’s capacity but it’s the amount/volume of honey associated with the vessel (via Transfers and/or Adjustments) that is key.
Here's a "how to" overview (PDF document) on how vessels fit in the process from Extraction through to Sales: From Honey Extraction to Sales (Tap to open)
The app has a feature called Valuation profiles. These are pricing frameworks that can be associated with an unsold Storage Vessel.
Assign a Valuation profile to a Vessel while using the Transfer Honey (or Adjust Contents) feature in Honey Inventory and the value of the Vessel contents will be calculated accordingly.
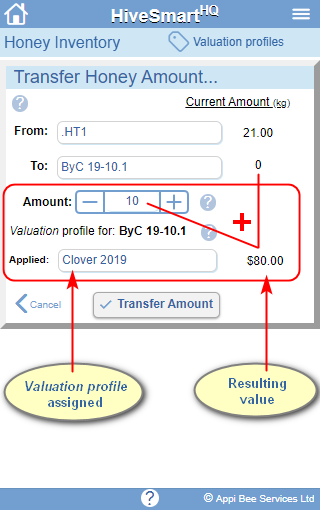
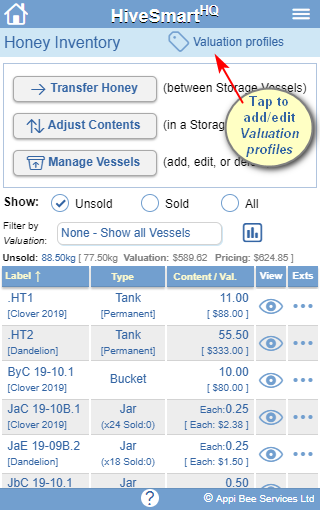
Valuation profiles can be defined as either a flat rate or a variable rate (i.e. where smaller amounts can be valued at a higher per kg/lb rate than larger/bulk amounts).
Furthermore, Sale Pricing adjustments can be included in the Valuation profile so that a default Sale Price also reflects additional adjustments beyond a raw value (perhaps the container cost and/or other factors such as Sales tax and/or a margin percentage.) Here are examples of each.
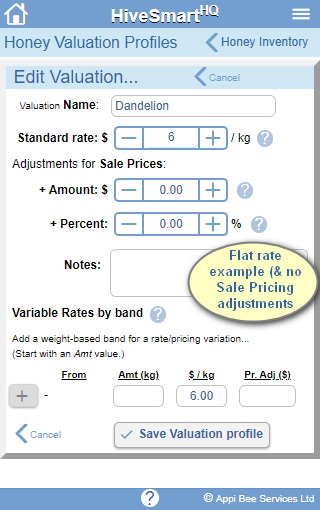
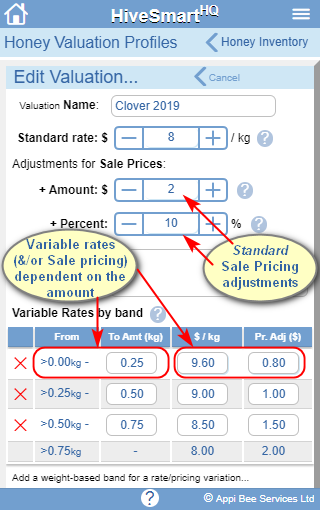
Viewing a Valuation profiles provides a summary comparison between raw Valuation results and the default Sale Pricing when the framework is applied...
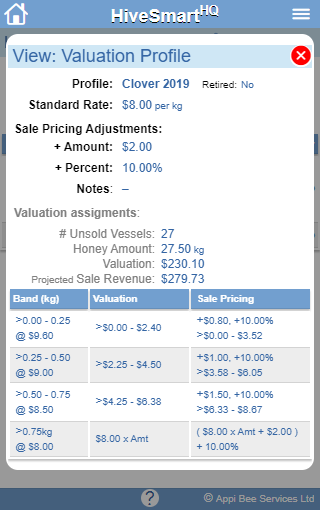
Assigning a Valuation profile to an unsold Vessel also means that a default Sale price is automatically loaded when the Vessel is subsequently part of a Honey Sale.
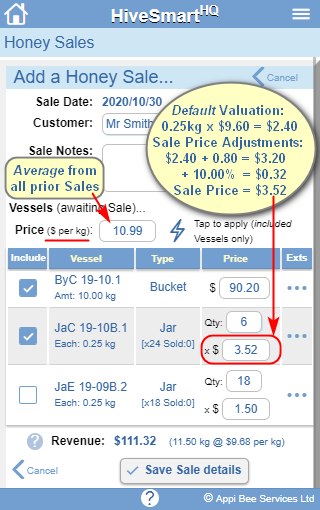
The default Sale Price can be overridden by the manual input of a specific value for that Vessel. There's also the option of applying a different weight based value to all included Vessels in that Sale - the default value is the average from all past Sales (but this too may be replaced with a different value before being applied).
HiveSmartHQ allows you to create Seasonal Checklists of reminders (e.g. tools to take, things to do for an inspection etc) that relate to a specific time of year.
Items can be easily added and assigned to one or more months via Seasonal Checklists from the App Options & Settings menu.
Then they're right there for you as a reminder when doing a Service (inspection) or Extraction - access the checklist via the icon in the footer of the Hive Management and Honey Extraction windows.

HiveSmartHQ provides the ability to extract Service/inspection data for analysis in a spreadsheet. This can be done using the multi-Tool found via the Hive Management menu option
Various filters can be applied (including date ranges) to restrict the data retrieved if needed. Then use the Export option. This creates a CSV (comma separated value) file and stores it into the default download folder for your browser (or generates a draft email with the extracted data for browsers that don't support CSV generation).
CSV files can be opened or imported into any spreadsheet.
If your browser can't generate a CSV file and a draft email is generated instead with the data, follow the instructions below:
- Select the data in the email and copy it into an application that can save a text (*.txt) file e.g. Word, Notepad
- Save the content in that application as a text file (e.g. Extract.txt) then close the application
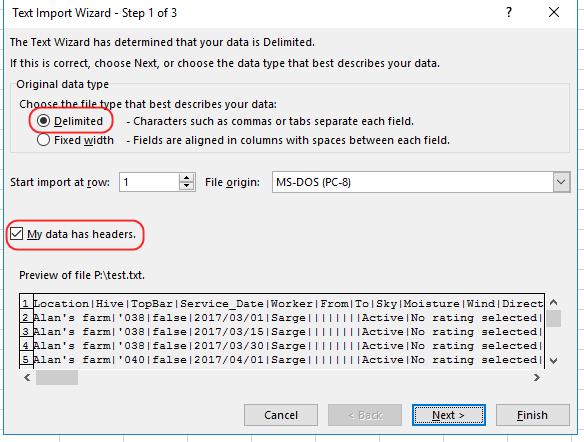
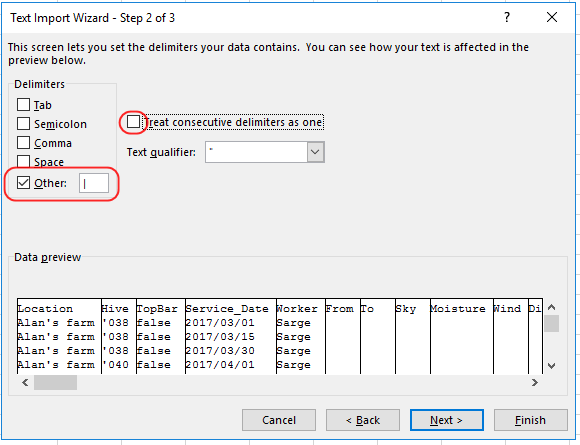
- Now open the same text file using a spreadsheet e.g. Excel, Google Docs, LibreOffice Calc. The spreadsheet application should automatically start an Import Wizard to convert the data into a spreadsheet format - the steps involved with the import process will vary depending on the spreadsheet application being used (and the version of that). However, each should provide the ability to select the following options during the import process:
* content has headers
* delimited (not fixed width)
* Set the delimiter used as: | (the "pipe" symbol)
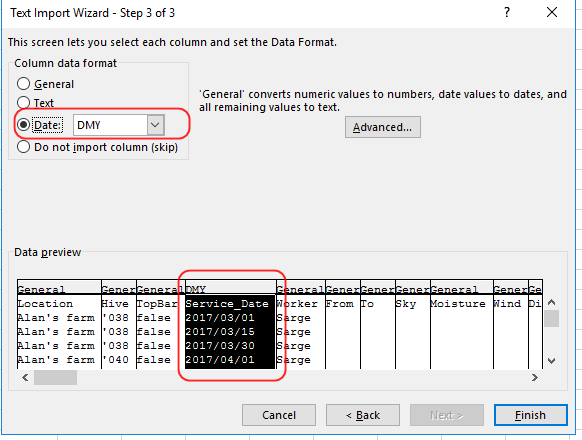
Some wizards also allow specific columns to be (optionally) designated as dates. - Once the data is imported, use the File/"Save as" option to save the spreadsheet in the default spreadsheet format (e.g. Excel: Extract.xlsx)
The spreadsheet with the extracted Service data can then be used as normal to manipulate, graph or compare Services as required.
As an example of the import process, here's some screenshots using Excel 2016:
Good Ideas
Having an unique identifier on each Hive is a really helpful thing to do for lots of reasons (including keeping records) - and increasingly a requirement in many areas.
If you've got many hives, one option to consider is using stock tags (available from Rural Supply shops or online) - they come in various sizes, shapes and can come pre-numbered.
They're also designed to last well outdoors - far better than printed labels/stickers.
NOTE: Some stock tags aren't flat which can make them a bit trickier to attach to a hive. A beekeeper we know addresses this with a short strip of tree-webbing - the tag is attached (crimped) onto one end of the strip and the other end is screwed onto the hive.
When completing an inspection use Service Notes to make note of anything that needs doing at the next visit. Then just use Views/Service Notes before the next Service (inspection) to see all of the notes made at the last Service for each Hive at that Location.
It's a really handy time and sanity saver and helps ensure you take everything you need before heading out.
HiveSmartHQ stores the data on your device (so you can use it in remote locations on mobile devices where there's no internet connection). This means it's really wise to make sure you're "backing up" the data i.e. are keeping a copy of your data somewhere else in case your device fails or is lost.
To do this, use the Transfer data > Upload Database feature in HiveSmartHQ (via App Options & Settings).
We recommend using this any day that you've updated your data - it'll help you sleep easy knowing the data has been safeguarded.
There's a lot of flexibility built into HiveSmartHQ so that you can tailor it to your specific needs and geographic area.
For example, there's various Option Catalogs (lists) such as Nectar & Pollen Sources, Diseases, Treatments & types of Storage Vessels for honey.
The app allows you to add new items, edit existing items and choose which to show or hide in each list.
Within each catalog, you can re-order the list too so that the most frequent ones you use are at the top of the selection. Bee-autiful!
A lot of screens on smartphones and tablets are not touch-sensitive when wearing gloves. So, if you don't have a conductive stylus, try using a conductive object instead - it just needs to be about 5mm (1/4") wide e.g. a metal-topped pen or a pencil with some aluminium foil taped onto the top of it, the head of a bolt, a multi-tool, or even a freshly cut twig!
Smartphones and tablets typically allow audio to be recorded. Try using a Bluetooth™ headset paired with you smartphone/tablet and record Inspection details that way.
Then update HiveSmartHQ later in a clean, more comfortable environment.
To help, we've provide a checklist "form" that you can have nearby for reference to help trigger the info you wish to record...
NOTE: You may wish to laminate the checklist if you have that option available.

